Dec 12, 2010 - Installing Gentoo on the ALIX.3D2 SBC
The Hardware
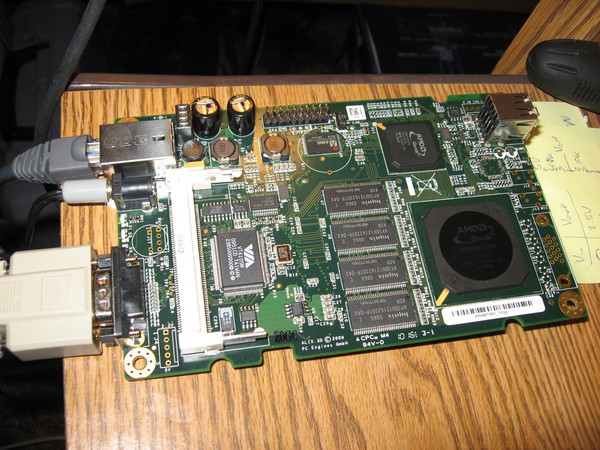
As part of turning my robot into my senior project, I'm upgrading the main processor from a microcontroller to a low-power single-board computer, the ALIX.3, with a 500MHz AMD Geode LX processor and 256MB of RAM. I chose this board out of many because it's small, about 4 by 6 inches, I think that it will have enough processing power for my application, and at 5W it draws relatively little power. It has a CompactFlash card slot on the back of the motherboard that is used as the primary hard drive, resulting in a system that has no moving parts. I chose an 8GB CompactFlash card from NewEgg as my hard drive.
The OS
I plan to run linux on this board, mostly becuase linux is highly configurable, lighweight, and doesn't need a keyboard or monitor to run, and this board has neither. Since the board manufacturer recommends iMediaLinux I figured I would try that first. The distribute a very minimal CompactFlash card image, which is targeted for this system. I was able to install and run this image without issue, but it doesn't come with a compiler installed, and the package repositories that it's supposed to use for updates are down, so it is almost impossible to install new software. I needed a new distribution.
The two main distributions under consideration were Gentoo and Debian, largely because I'm familiar with both. It looked like it would be possible to install either, but I decided to go with Gentoo because it has better development tools, and it's easy to install the latest versions of most packages.
I used the Gentoo x86 Handbook as a guide when installing Gentoo, but I took a few liberties with the install process. Rather than start with the disk in my target machine, I put it in a card reader and started the install on my desktop. I created a single partition on the disk, set it as bootable, and formatted it as ext3. I created a temporary directory to work in, downloaded the i486 stage3 tarball and the portage snapshot to my directory, and created a mnt subdirectory where I mounted my CF card. I unzipped the stage3 tarball and snapshot with:
tar -xjpvf stage3-i486-20101116.tar.bz2 -C mnt/
tar -xjvf portage-latest.tar.bz2 mnt/usr/
I set up the chroot according to the installation instructions, and once I was chrooted into the new system, modified /etc/make.conf and set my CFLAGS to "-O3 -march=geode -pipe". I set -O3 to turn on more optimizations, which should be relatively safe given that I won't be running anything fancy software like OpenOffice that tends to break when compiled with -O3. I set -march=geode to optimize for the geode processor on my board, and -pipe was one of the default options, so I left it there. I then proceeded to run 'emerge -e world' to rebuild the entire system with the new compile flags, and went to bed for the night.
With all of the packages up to date, it's time to build the kernel, so I installed the latest gentoo-sources package. Unfortunately, since kernel compiles are best done on the same architecture as the target system, I had to move the compilation to the target system, since geode is 32-bit x86 and my desktop is 64-bit x86. If I had had any 32-bit linux computers around, I could have done my compile on one of them instead. By now you're probably wondering "how can you compile a kernel if you don't have one to boot from?" The trick here was that I had two CompactFlash cards, one with the iMediaLinux image on it, and one with my half-installed Gentoo system on it. I put the iMediaLinux card in the primary card slot, booted from it, and move my USB card read from my desktop to my target board. I was then able to mount my Gentoo install, set up the chroot again, and proceed with my kernel compile.
I built the 2.6.35-gentoo-r12 kernel, and my full kernel configuration is available here. In particular, I enabled most of the drivers for the CS5536 chipset that the ALIX.3 board uses. Don't forget to enable hard disk drivers (there's a CS5536 IDE/ATA driver), and network drivers (Via Rhine).
If you want to be able to use the kernel led control subsystem, you'll need to disable the CS5536 GPIO module (under miscellaneous), to enable the Alix led driver. Don't forget to enable some of the led trigger modules too; they're pretty cool! This post talks about it in more depth.
Since hardware monitoring is nice, and because I intend to populate and use the I2C bus for other things, I enabled the Geode I2C driver (the module is called scx200_acb), and the lm90 driver for the I2C temperature monitoring chip. Don't forget to install the lm_sensors package when you're done if you want to be able to read temperature values from your sensors.
I don't have any immediate plans for it, but since it's there I enabled the crypto driver for the Geode AES hardware accelerator.
With my kernel configuration complete, I compiled and instlled my kernel and modules. Don't forget to set the system clock before you do this, or make will get confused. If you get the time to within a few hours, you should be fine; the problems arise when the clock is slow by a few years.
Following the rest of the Gentoo install guide, I set up /etc/fstab. Don't copy it from the iMedia install; they mount a tmpfs on top of /var, and they don't mount /dev/shm properly, which cause major issues in gentoo. I also set up and intalled grub. My config and the commands I used to install grub:
grub
device (hd0) /dev/sdX
root (hd0,0)
setup (hd0)
quit
Since this disk will be at a different hardware device when we boot, we need to tell grub the device mapping explicitly. Note that you should replace /dev/sdX with whatever device your target card happens to be. Also note that my grub configuration has special options to enable gurb over the serial port, and I'm passing special options to the kernel to enable the console output over the serial port. Finally, you should modify /etc/inittab to enable login over serial (ucomment the line with /dev/ttyS0)
With all of that complete, you should be ready to go. Power down the system, swap the finished card into the onboard CF slot, and enjoy. Sadly, at this point I had to do a lot of troubleshooting, but I think I've mentioned all of the issues I had.
Potential Hardware Modifications
There's an unpopulated TTL-level serial header on my board. I've probed it with an oscilloscope, and confirmed that it appears to be putting out a 0-5V serial signal, and is attached to /dev/ttyS1, contrary to the docs that it's a copy of the external comp port. I intend to pupulate this with a header and use it to communicate with the rest of my roobt.
There's a similar unpopulated I2C header on my board, and I was able to use my oscilloscope and the i2cdetect program (from the i2c-tools package) to confirm that it's attached to the internal I2C bus and operates at the advertised 3.3V levels. If I find a external I2C devices that I want to add to my robot, I'll populate this header and hook them up.
Finally, the fact that this board doesn't have a battery-backed RTC clock is an incredible inconvenience when running gentoo, because it causes problems and build loops. There's an unpopulated space for a RTC battery on my board, and I'll probably be populating it once I figure out which battery I need.
Update: I've installed the headers for all three of these. The first two were easy, since the holes were open and I had the proper headers. For the RTC, I ended up referring to the manual here, which informs me that I have to install jumper J16 in order to prevent it from resetting when I remove power. Now that the jumper and the battery are installed, it maintains the clock when I remove power.
Home